Showing posts with label Doll Crafts. Show all posts

Friday, June 14, 2013

Camp Doll Whiz: Make a Hiking Backpack

 Hey, readers! Do you have a place to hike at your doll camp? If you do, then your dolls need a backpack to carry their hiking gear! Let's make a backpack using a household item. Would you expect that a doll backpack could be made out of a gift bag? Well, it can! If you are one of those see-it-to-believe-it kind of people, then keep reading to watch a magical transformation!

  To make a doll hiking backpack you will need:
  • A gift bag (you will need one with handles unless you plan to make duct tape straps)
  • Scissors
  • Tape (you can use clear tape, but I used duct tape and then covered the whole bag with duct tape)
  • Decorations (stickers, duct tape)
 Once you have gathered your supplies, read the directions to get crafting!


 Step 1: Get out your gift bag. Mine was white paper, but any bag will work.


Step 2: Rip the handles off of the inside.


Step 3: Make a fold at the top as shown. You may need to flatten your bag to fold it. I would fold the top halfway.


 Step 4: Cut one side of the bag off, below the fold line in step 3.


 Step 5: Stand your bag up straight again and fold it on the crease. Use tape to hold the fold down. (If you are not covering the bag with duct tape then I suggest using clear tape for this step.)


 Step 6: Take one of your handles and tape it to one side of the bag. Repeat on the other side, keeping in mind that you need to put a flat side against your doll's back, not a pointy corner.


 Step 7: If you are using duct tape like me, cover the rest of your bag with duct tape. If you are coloring the bag with markers or covering it with colored paper, do that now.


Step 8: Add additional embellishments to your bag.


Look at what you can put in this bag! The contents include 4 water bottles, a camera, a box of raisins, a bag of trail mix, a bottle of sunscreen, and a bird guide book!


 After picking up her backpack at the front desk, Nellie walks back to her cabin so that she can take the girls on a hike!


 Are you going to make your dolls a hiking backpack? As you saw from the photos, they can carry a lot!  And I hope, see-it-to-believe-it people, that you can now see that a bag can become a backpack! 

 So, before you throw out your gift bags after a party, make them into something new! Thanks to my mom for coming up with the idea for how to make this backpack. See you later with more fun activities! :Doll Whiz

 P.S. The directions for this craft may be confusing, so if you have any questions, leave them in the comments and I will answer them.

Wednesday, June 12, 2013

Camp Doll Whiz: Time for Lunch!

 Hello, readers! I hope your dolls are having fun at camp! But by now, do you think that they are hungry? Probably! So, we are going to make them some food! 

 Today's lunch is not really considered "camp food", and it is all food that I have made in the past. But, I hope you enjoy looking at the ways to make these foods!

 Rebecca gets in the line at the cafeteria cabin. Chef Mollie will serve her.


 Here is a closer look at Rebecca's tray. It started out as a piece of cardboard. Then, I put construction paper on the front of the tray. Hold the paper down with duct tape and voila! A tray! I left the back plain (no construction paper.) The plate is from the Our Generation Baking Set, and the silverware is from the Our Generation R.V. Seeing You Camper Accessories.


 Take a look at what's for lunch!


 Here's some grapes, blueberries, and raspberries. The grapes and blueberries are blue and purple beads. The raspberries are made by stringing 5 pinkish-red beads onto a small bracelet cord (any string will work though) and tying the ends into a knot. The beads will become a circle. Arrange the beads so that one bead is at the bottom and there are two on either side (see picture). And there are your raspberries!


Make your dolls some punch! Tear up some tissue paper and stuff it into a doll sized pitcher. The cups and pitcher are from the Our Generation Baking Set.


Present some pizza by cutting a circle out of tan construction paper. Cut a red construction paper circle or two and glue that on top of your tan circle for sauce. Then glue on some strips of yellow construction paper for cheese. Add any additional toppings you want!


Serve some pasta by cutting long pieces of white yarn and curling them up on a plate.


Oooh, dessert! All of these items (the tiered display included) are either from the Our Generation Baking Set or the Our Generation R.V. Seeing You Camper Accessories Set.


"Boy, am I glad that I don't have to eat mystery meat! Isn't that what they usually serve at cafeterias?" said Rebecca as she got some pasta.


 So, make some lunch for your dolls! Use your imagination! Some of these foods were inspired by the American Girl craft book "Doll Dining". See you later! :Doll Whiz

 P.S. Don't forget to vote at the poll!

Sunday, June 9, 2013

Camp Doll Whiz: Make Camp Name Tags

 Hello, readers! I hope you enjoyed the camp check-in photo story that I made (click here if you haven't read it yet). Today we're going to go back to camp. But this time, you get to make a craft! With inspiration from Doll Diaries, I present this photo story/craft!


 Early this morning, Consuelo woke up stressed. Why? She forgot to make the staff name tags! Consuelo was, after all, the arts and crafts director.


 So, Consuelo quickly got dressed and headed over to the Arts and Crafts cabin. Then, she pulled out all of her supplies. These included:

  • Ribbon
  • Paper (it can be scratch paper)
  • Scissors
  • Clear tape
  • Markers, pencils, crayons, or whatever you want to use to draw


  Step 1: Cut out some rectangles from your paper for however many dolls you need. Consuelo had to make one for Mollie, one for Bethany, one for Nellie, and one for herself, so that meant that she needed four rectangles.


 Step 2: Decorate the paper with a name, position, and some drawings like Consuelo did.


 Step 3: Cover the paper with clear tape.


 Step 4: Put the ribbon around the doll's neck to measure the length. Keep in mind that it needs to be large enough to be able to slip over the doll's head.


 Step 5: Use some more tape to attach the ribbon to the name tag.


 Step 6: Put it on your doll!


Then Consuelo had to make three more for the rest of the staff and place them at everyone's doorway so that she wouldn't wake the sleeping dolls.


 Consuelo went back to the Arts and Crafts room to see what else she could do since she was up.


 But, she didn't get very far! She fell asleep on the desk!


 So, I hope you had fun making these name tags and reading this photo story! If you want to see how Doll Diaries did theirs, click here. Keep watching for more of Camp Doll Whiz! Later! :Doll Whiz


Sunday, May 12, 2013

How to Make a Doll Purse

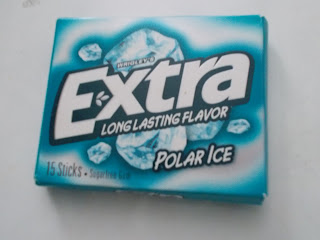
 Hey, everyone! I have recently done a project that I think you will like! I have made a doll purse. What you don't know is that it is made from a gum package!

 Thanks to Doll-it-up @ Doll Diaries for inspiration.

 Let's get started!


 What you need:

  *Gum package (I used Extra)
  
  *Duct tape

   *Hook and loop squares

  *Ribbon or something that can be used for a strap (I used potholder loops from a project set)

  *Rhinestones, sequins, or any other decorating supplies to make this purse your own


 Step 1: Find a gum package.


 Step 2: Find the color of duct tape that you want to use.


 Step 3: Start to cover your gum package with duct tape.


Step 4: Cover the sides with duct tape. You can switch colors if you like.


Almost done! Now, this gum package had a hole to slide the top into so you could close it, but I just covered the hole with duct tape and stuck hook and loop squares onto the purse to make it close.


 Step 5: Add a strap.


Step 6: Add your ribbons and rhinestones and Voila! You have a purse!


Looks like Kanali just so happened to pick up this stylish new bag.


For such a small width...


 ...so much can fit inside!


Let's see... 5 one dollar bills...


a library card...


an MP3 player...


 a gift card...


and a small book!


 I hope you enjoyed this tutorial! Make your own purses and play! Auf Wiedersehen! :Doll Whiz

Sunday, March 24, 2013

Recycling Items Into Doll Accessories

 Hey readers! Have you ever made items for your dolls out of household objects? Here are a few things that I have made in that category.

 First, here are some little doll cakes that I believe were made from deodorant caps. I covered them with Knot-a-Quilt squares and then decorated them with ribbon and jewels.


  Next, we have a Springfield shirt that can be a summer dress for cute little Consuelo.


 We used American Girl's "How to make American Curls" set to give Consuelo some waves in the back.


  And last, but never least, Kanali doing some tricks on the uneven bars at her gym. This item was made using cardboard, construction paper, the frame of a baby doll play pen, and lots of tape!


 The moral of the story is: reuse household items and make them doll accessories! The deodorant caps were headed to the recycling bin before I "rescued" them. And, the baby doll playpen is not currently being set up, so it makes good uneven bars. Also, try closet swapping to see if something that looks good on one doll can look good on another doll! Hope these tips help you make great crafts in the future! :Doll Whiz
 P.S. I hope you get my new name. It is a smiley face that fits into my name.